
Table of contents
- What Complete Removal Really Means
- Quick Comparison by Device
- How to Uninstall Proton VPN on Windows
- Step 1: Disconnect and close the app
- Step 2: Remove Proton VPN from Windows Settings
- Step 3: Check Windows VPN profiles
- Step 4: Check network adapters carefully
- Step 5: Remove startup entries and app data
- How to Remove Proton VPN on Mac
- Step 1: Quit Proton VPN
- Step 2: Delete the app
- Step 3: Remove VPN configurations and profiles
- Step 4: Check login items and leftover files
- How to Delete Proton VPN from iPhone or iPad
- How to Uninstall Proton VPN on Android
- Step 1: Turn off always-on VPN
- Step 2: Uninstall the app
- When Reinstalling Is Better Than Full Cleanup
- Common Mistakes to Avoid
- Final Takeaway
- FAQ
- Does uninstalling Proton VPN delete my Proton account?
- Why do I still see Proton VPN in my VPN settings?
- Should I remove TAP or Wintun adapters on Windows?
- Will deleting Proton VPN cancel my subscription?
- Is reinstalling Proton VPN enough to fix connection problems?
To uninstall Proton VPN completely, remove the app first, then check for leftover VPN profiles, startup items, cached settings, and network components that the app may have used. On Windows, this can include VPN-related adapters or drivers. On macOS and mobile devices, the most common leftovers are VPN configurations, device management profiles, login items, and app data. If your only goal is to fix a connection bug, a clean reinstall may be safer than deleting every related component.
Before you start, disconnect Proton VPN, turn off any kill switch or always-on VPN setting, and make sure you know whether another VPN app uses the same network driver. Most people can remove Proton VPN in a few minutes, but the cleanup checks below help prevent two common problems: a VPN profile that keeps reappearing in settings, or a network adapter that keeps affecting connectivity after the app is gone.
What Complete Removal Really Means
Removing the Proton VPN app deletes the main program, but it does not always remove every setting that was created while you used it. A complete removal usually covers four areas:
- The Proton VPN application itself.
- Saved VPN configurations or device profiles.
- Startup or login items that launch the app in the background.
- Local app data, cache files, logs, and platform-specific network components.
This process does not delete your Proton Account. It also does not automatically cancel a paid plan or a mobile app store subscription. If you subscribed through the App Store or Google Play, manage the subscription from that store separately.
Quick Comparison by Device
| Device | Main uninstall step | Leftovers to check | Special caution |
|---|---|---|---|
| Windows | Settings > Apps > Installed apps | VPN profile, startup item, Proton folders, network adapters | Do not remove TAP or Wintun adapters if another VPN still needs them |
| Mac | Move Proton VPN from Applications to Trash | VPN configuration, login item, Library folders, profiles | Managed profiles may require an admin or organization account |
| iPhone or iPad | Delete the app from the Home Screen or App Library | VPN configuration under VPN & Device Management | Deleting the app does not cancel an App Store subscription |
| Android | Uninstall from Settings or the app drawer | Always-on VPN setting, saved VPN entry, app storage | Turn off Block connections without VPN before uninstalling |
How to Uninstall Proton VPN on Windows
Windows is the platform where extra cleanup matters most because VPN apps often install network drivers or virtual adapters. Follow the standard uninstall first, then check the leftovers only if needed.
Step 1: Disconnect and close the app
- Open Proton VPN and disconnect from the VPN.
- Turn off the kill switch if it is enabled.
- Right-click the Proton VPN icon in the system tray and choose the option to quit or exit.
This avoids a situation where Windows keeps enforcing a VPN-related network rule after the app has been removed.
Step 2: Remove Proton VPN from Windows Settings
- Open Settings.
- Go to Apps > Installed apps. On older Windows versions, use Apps & features.
- Find Proton VPN.
- Select Uninstall and follow the prompts.
- Restart Windows after the uninstall finishes.
A restart is worth doing even if Windows does not demand it. It lets Windows unload services and network components that were active during the uninstall.
Step 3: Check Windows VPN profiles
- Open Settings.
- Go to Network & internet > VPN.
- If you see a Proton VPN profile that remains after uninstalling the app, remove it.
The Proton VPN desktop app usually manages connections through its own app interface, but checking this area is still useful if you previously created manual VPN profiles or tested different protocols.
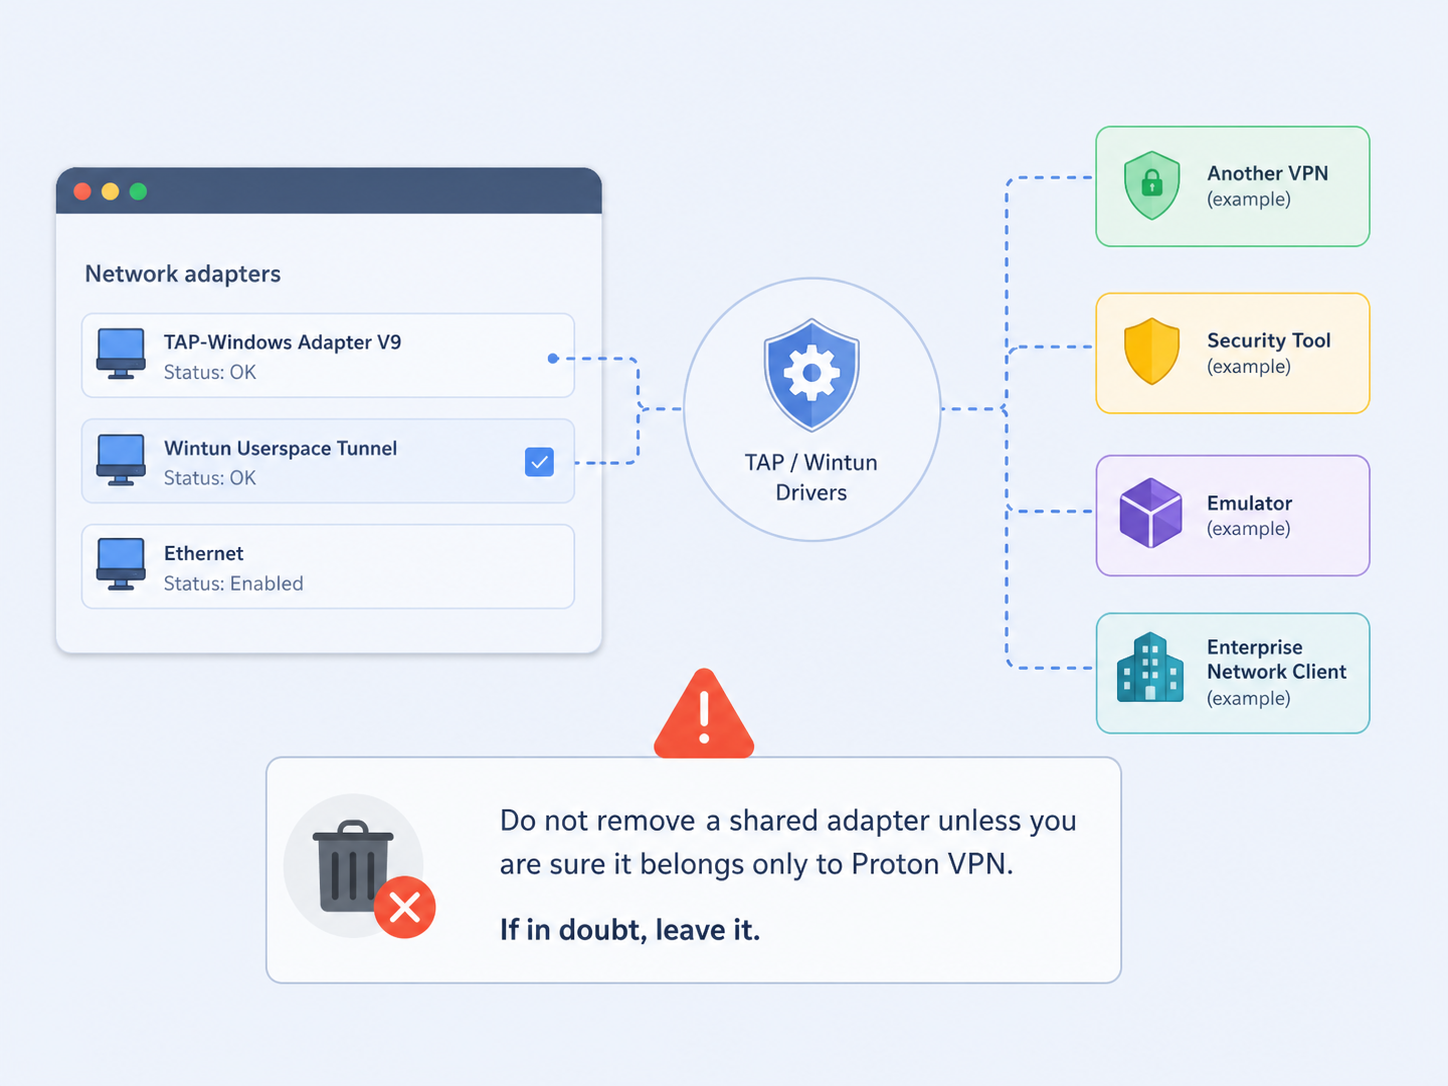
Step 4: Check network adapters carefully
- Right-click the Start button and open Device Manager.
- Expand Network adapters.
- Look for entries clearly linked to Proton VPN, TAP-Windows Adapter, Wintun, or other VPN tunnel adapters.
- If an adapter is clearly unused and tied to Proton VPN, uninstall it from Device Manager.
- Restart Windows again.
Be careful here. TAP and Wintun drivers can be used by more than one VPN application. If you use another VPN, security tool, emulator, or enterprise network client, do not remove a shared adapter unless you are sure it belongs only to Proton VPN. If in doubt, leave it in place or reinstall Proton VPN instead of attempting a manual driver cleanup.
Step 5: Remove startup entries and app data
- Open Task Manager and go to Startup apps.
- Disable or remove any Proton VPN startup entry that remains.
- Open the Run dialog and check %LocalAppData%, %AppData%, and %ProgramData% for folders named Proton VPN, ProtonVPN, or Proton AG.
- Delete only the Proton VPN folders you no longer need.
Deleting these folders removes local preferences, cached data, and logs. It does not remove your Proton account. If you plan to reinstall and want to preserve settings, skip this cleanup step until you know the reinstall works.
How to Remove Proton VPN on Mac
On macOS, the app removal is simple, but VPN configurations, login items, and Library files may remain. The exact wording in Settings can vary slightly by macOS version.
Step 1: Quit Proton VPN
- Disconnect the VPN.
- Open Proton VPN and quit it from the app menu, or use the menu bar icon if it is running there.
- If the app will not quit, open Activity Monitor and stop Proton VPN-related processes.
Step 2: Delete the app
- Open Finder.
- Go to Applications.
- Move Proton VPN to Trash.
- Empty Trash after you are sure you do not need the app.
Step 3: Remove VPN configurations and profiles
- Open System Settings.
- Check VPN for any Proton VPN configuration and remove it.
- Go to General > VPN & Device Management and remove any Proton VPN profile if one is present.
If the remove button is unavailable, the Mac may be managed by an employer, school, or device management system. In that case, you may need an administrator or the organization that controls the device to remove the profile.
Step 4: Check login items and leftover files
- Open System Settings > General > Login Items.
- Remove Proton VPN from items that open at login, if it appears.
- In Finder, check Library locations such as Application Support, Caches, Preferences, and Logs for folders or files named Proton VPN, ProtonVPN, or Proton AG.
- Delete only the items clearly tied to Proton VPN, then restart the Mac.
Most users do not need to dig through Library folders unless they are troubleshooting a broken install, preparing a clean reinstall, or removing the app from a shared computer.
How to Delete Proton VPN from iPhone or iPad
On iOS and iPadOS, uninstalling is usually clean because the VPN configuration is tied closely to the app. Still, it is smart to confirm that the VPN profile is gone.
- Disconnect Proton VPN if it is connected.
- Touch and hold the Proton VPN app icon.
- Choose Remove App, then Delete App.
- Open Settings > General > VPN & Device Management.
- If a Proton VPN profile remains, tap it and delete it.
If you cannot remove the profile, check whether Screen Time restrictions, a work profile, or a school device policy is preventing changes. Also remember that deleting the app does not cancel an App Store subscription. Manage that separately in your Apple ID subscription settings.
How to Uninstall Proton VPN on Android
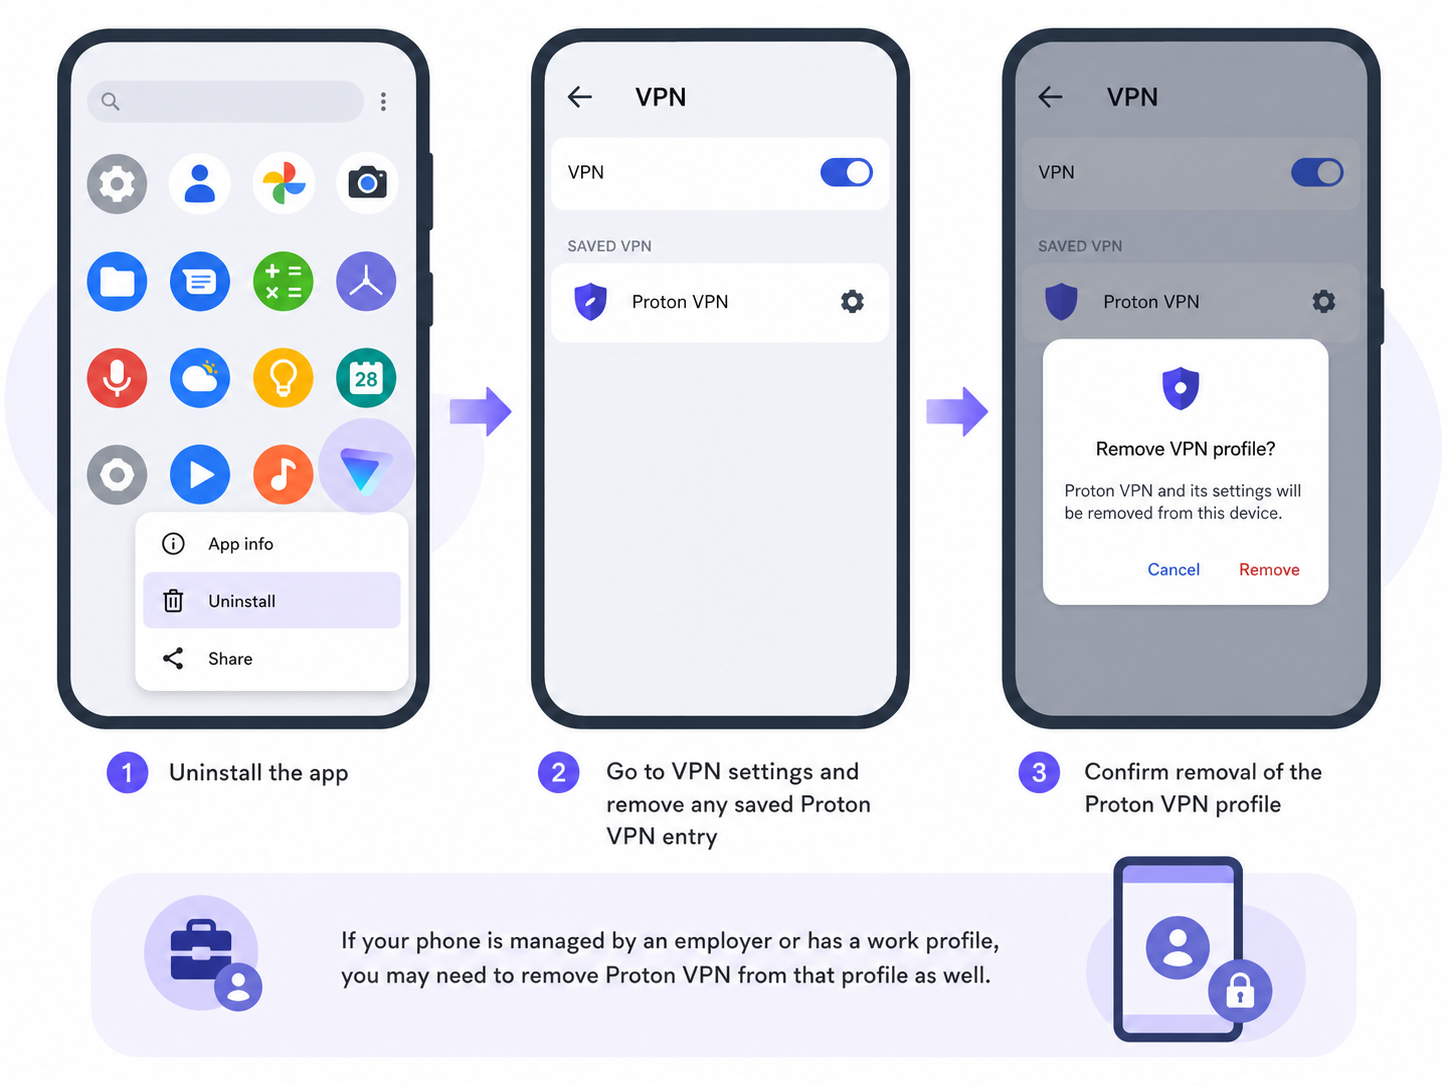
Android usually removes the app and its VPN permission together, but always-on VPN settings can cause confusion if they are left enabled before removal.
Step 1: Turn off always-on VPN
- Open Settings.
- Go to Network & internet > VPN. On Samsung devices, this may be under Connections > More connection settings > VPN.
- Tap the settings icon next to Proton VPN.
- Turn off Always-on VPN and Block connections without VPN if they are enabled.
Step 2: Uninstall the app
- Open Settings > Apps.
- Select Proton VPN.
- If you are troubleshooting, tap Storage and clear storage first.
- Tap Uninstall.
You can also uninstall from the app drawer or Google Play. Afterward, return to the VPN settings page and remove any saved Proton VPN entry if Android still shows one. If the phone is managed by an employer or has a work profile, you may need to remove Proton VPN inside that profile as well.
When Reinstalling Is Better Than Full Cleanup
Full removal is useful when you are switching VPN providers, selling a device, or trying to remove all local traces of the app. But if Proton VPN is simply not connecting, reinstalling may solve the problem with less risk.
Choose a reinstall first when:
- The app opens but fails to connect after an update.
- Windows reports a missing or broken VPN adapter.
- The app is stuck while switching protocols.
- You still plan to use Proton VPN and want to keep your account setup simple.
- You are unsure whether a network adapter is shared with another VPN or security app.
A good reinstall process is simple: uninstall the app, restart the device, install the latest Proton VPN app for your platform, sign in, and test one connection before changing advanced settings. If the same error returns, then do the deeper cleanup steps for your operating system.
Common Mistakes to Avoid
- Do not delete random network adapters just because they mention tunnel, TAP, or Wintun.
- Do not forget to turn off the kill switch or always-on VPN before uninstalling.
- Do not assume app deletion cancels your Proton subscription.
- Do not remove device management profiles from a work or school device without permission.
- Do not wipe app data first if you want to preserve settings for a quick reinstall.
Final Takeaway
For most users, the best way to remove Proton VPN is to uninstall the app, restart the device, and check the VPN settings page for leftover profiles. Windows users should also review startup items and network adapters, but only remove drivers they can clearly identify. If you are fixing a connection issue rather than leaving Proton VPN, try a clean reinstall before doing aggressive Proton VPN cleanup.
FAQ
Does uninstalling Proton VPN delete my Proton account?
No. Uninstalling Proton VPN only removes the app and local device data. Your Proton account, plan, and billing status remain active until you manage or cancel them separately.
Why do I still see Proton VPN in my VPN settings?
A saved VPN configuration or device profile may remain after the app is removed. Check the VPN settings on your device and delete the Proton VPN profile if it is still listed.
Should I remove TAP or Wintun adapters on Windows?
Only remove them if you are sure they were used by Proton VPN and are not needed by another VPN or network app. These adapters can be shared, so deleting the wrong one may break another service.
Will deleting Proton VPN cancel my subscription?
No. App deletion does not cancel billing. If you subscribed through Apple or Google Play, cancel through that store. If you subscribed directly through Proton, manage the plan in your Proton account.
Is reinstalling Proton VPN enough to fix connection problems?
Often, yes. If the issue is caused by a broken update, missing driver, or corrupted app setting, uninstalling, restarting, and installing the latest Proton VPN app is usually the safest first fix.